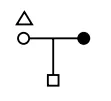
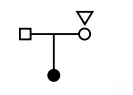
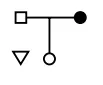
Consider the figures given below:
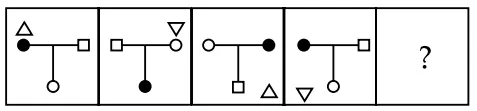
To fit the question mark, the correct answer is
Options
 I
Solution :
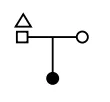
The correct option/answer is the first option: [IMAGE PROVIDED BELOW] (which corresponds to the figure showing a top-left upward-pointing triangle, an open square on the left, an open circle on the right, and a filled black circle at the bottom).
To find the figure that fits the question mark, we analyze the two main components of the pattern: the shapes at the ends of the T-shaped bar and the movement/orientation of the small triangle.
Step 1: Analyzing the rotation of the shapes at the T-junction
Let us label the three positions on the T-shaped structure as:
- L: Left end of the horizontal bar
- R: Right end of the horizontal bar
- B: Bottom end of the vertical line
The three shapes that occupy these positions are a filled black circle, an open circle, and an open square. Let's trace their values across the panels:
- Panel 1: L = Filled Circle, R = Open Square, B = Open Circle
- Panel 2: L = Open Square, R = Open Circle, B = Filled Circle
- Panel 3: L = Open Circle, R = Filled Circle, B = Open Square
- Panel 4: L = Filled Circle, R = Open Square, B = Open Circle
Observing the transition from one panel to the next, we see that the shapes rotate counter-clockwise (each shape moves to the next position in the counter-clockwise direction: L ⇒ B ��� R ⇒ L):
- The shape at L moves to B
- The shape at B moves to R
- The shape at R moves to L
Following this rotation rule from Panel 4 to Panel 5 (the question mark):
- The shape at L in Panel 4 (Filled Circle) moves to B in Panel 5.
- The shape at B in Panel 4 (Open Circle) moves to R in Panel 5.
- The shape at R in Panel 4 (Open Square) moves to L in Panel 5.
Therefore, for Panel 5, we must have: L = Open Square, R = Open Circle, and B = Filled Circle.
Step 2: Analyzing the small triangle
We track both the orientation (pointing direction) and the position of the small open triangle:
Orientation Pattern:
- Panel 1: Upward-pointing (Δ)
- Panel 2: Downward-pointing (∇)
- Panel 3: Upward-pointing (Δ)
- Panel 4: Downward-pointing (∇)
- Panel 5: Must be Upward-pointing (Δ) (since it alternates in every step).
Position Pattern:
The triangle moves clockwise around the four outer corners of the T-junction:
- Panel 1: Top-Left (above L)
- Panel 2: Top-Right (above R)
- Panel 3: Bottom-Right (below R)
- Panel 4: Bottom-Left (below L)
- Panel 5: Must return to the Top-Left (above L) position.
Conclusion:
Combining these rules for Panel 5, the correct figure must have:
- An open square on the left, an open circle on the right, and a filled black circle at the bottom.
- An upward-pointing triangle located in the top-left position (above the open square).
This matches the first option: [IMAGE PROVIDED BELOW].
Completely free for students. Educators & coaching institutes get 2 months free Pro trial to create tests.
Access unlimited practice questions, detailed step-by-step solutions, and exam study materials — completely free for students.
Create and conduct professional online assessments with AI question generation, tab proctoring, and comprehensive batch management.
SSC CHSL Tier-1 Shift 1 2 July 2024 question paper with answers and detailed solutions. This practice paper covers questions from General Intelligence & Reasoning, General Awareness, Quantitative Aptitude, and English Language as asked in the SSC CHSL Tier-1 examination. Practice the SSC CHSL 2 July 2024 Shift 1 paper to understand the exam pattern, question types, difficulty level, and important topics for upcoming SSC CHSL exams.
SSC CHSL Tier-1 Shift 2 held on 2 July 2024 question paper with answers and detailed solutions. This previous year paper covers General Intelligence & Reasoning, Quantitative Aptitude, General Awareness, and English Language. The SSC CHSL Tier-1 exam was conducted in CBT mode with 100 questions for 200 marks and a 60-minute duration.
Copyright © 2026 Combe Labs Private Limited. All Rights Reserved.