
Select the figure that will replace the question mark (?) in the following figure series.
Options
Correct Answer :
Solution :
The correct answer is Option D.
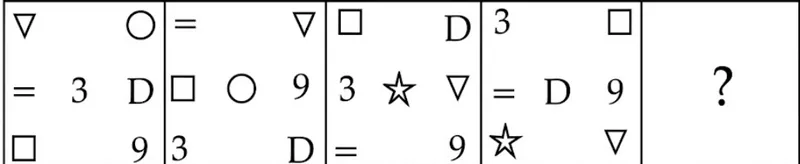
The question presents a 3×4 series of boxes, each containing a set of symbols and numbers. We need to identify the pattern and find the missing 4th box (marked with "?").
Step 1: Identify the elements in each box.
By carefully reading the main figure, the four boxes contain the following symbols arranged in a 3×3 layout within each box:
Box 1:
Row 1: ∇ (top-left), ○ (top-right)
Row 2: = (left), 3 (center), D (right)
Row 3: □ (left), 9 (right)
Box 2:
Row 1: = (top-left), ∇ (top-right)
Row 2: □ (left), ○ (center), 9 (right)
Row 3: 3 (left), D (right)
Box 3:
Row 1: □ (top-left), D (top-right)
Row 2: 3 (left), ☆ (center-left), ∇ (center), = (center-right), D (right)
Row 3: = (left), 9 (center), ☆ (right), ∇ (far-right)
Step 2: Identify the symbols present across all boxes.
The recurring elements across all boxes are: =, 3, D, □, ○, 9, ∇, ☆. Each box rearranges these symbols in a different configuration.
Step 3: Track the positional rotation/shift pattern.
Looking at the position of symbols from Box 1 → Box 2 → Box 3, each symbol shifts its position in a consistent clockwise or anti-clockwise rotation pattern within the 3×3 grid:
- The symbol = moves from the middle-left (Box 1) → top-left (Box 2) → bottom-left (Box 3)
- The symbol ∇ moves from the top-left (Box 1) → top-right (Box 2) → middle-right (Box 3)
- The symbol □ moves from the bottom-left (Box 1) → middle-left (Box 2) → top-left (Box 3)
- The symbol ☆ appears at the center in Box 3, moving further in Box 4
- The symbol D moves from the middle-right (Box 1) → bottom-right (Box 2) → middle position in Box 3
- The symbols 3 and 9 maintain their relative bottom positions and shift systematically
Step 4: Determine the arrangement for the missing Box 4.
Following the established rotation/shift pattern, the 4th box should contain:
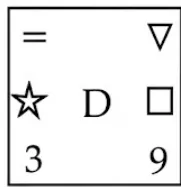
Row 1: = (top-left), ∇ (top-right)
Row 2: ☆ (left), D (center), □ (right)
Row 3: 3 (bottom-left), 9 (bottom-right)
Step 5: Match with the given options.
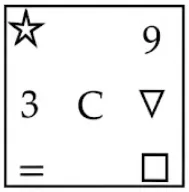
- Option A: Shows ☆ (top-left), 9 (top-right), 3 (left), C (center), ∇ (right), = (bottom-left), □ (bottom-right) — does NOT match.
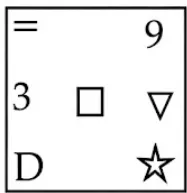
- Option B: Shows = (top-left), 9 (top-right), 3 (left), □ (center), ∇ (right), D (bottom-left), ☆ (bottom-right) — does NOT match.
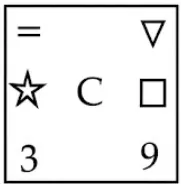
- Option C: Shows = (top-left), ∇ (top-right), ☆ (left), C (center), □ (right), 3 (bottom-left), 9 (bottom-right) — close but has "C" instead of "D", does NOT match.
- Option D: Shows = (top-left), ∇ (top-right), ☆ (left), D (center), □ (right), 3 (bottom-left), 9 (bottom-right) — this perfectly matches the expected arrangement derived from the pattern.
Therefore, Option D is the correct figure that replaces the question mark in the series.
Access expert-curated educational resources and study materials—completely free.
Create, conduct, and manage professional online assessments with Mindyard. Perfect for teachers and institutes.
Copyright © 2026 Mindyard. All Rights Reserved.