
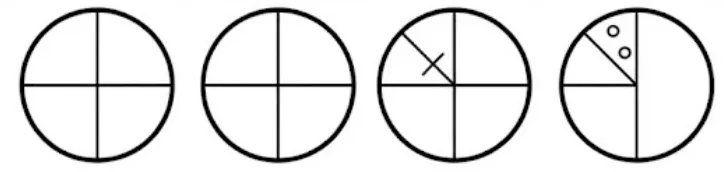
The sequence of folding a piece of paper and the manner in which the folded paper has been cut is shown in the following figures. How would this paper look when unfolded?
Options
Correct Answer :
Solution :
To determine how the paper will look when unfolded, we trace the folding and cutting process in reverse order using the principles of symmetry and mirror reflection.
Step 1: Analyze the Folding Sequence and Layers
1. The circular sheet of paper is first folded along the vertical diameter, reducing it to a semicircle (consisting of 2 layers).
2. Next, it is folded along the horizontal diameter, reducing it to a quadrant or quarter-circle (consisting of 4 layers).
3. Finally, the quadrant is folded diagonally along the line passing through the center, forming an octant (consisting of 8 layers of paper).
Step 2: Analyzing the Cuts/Holes
In the final folded state (the octant), two circular holes are punched near the vertical edge of the sector (one inner hole closer to the center, and one outer hole closer to the perimeter).
Step 3: Tracing the Unfolding Process
We now mentally unfold the paper in the reverse order of the folds, reflecting the holes across each crease:
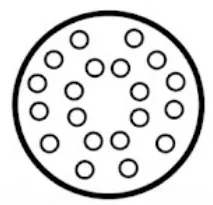
1. Unfolding the diagonal crease: The 2 holes are reflected across the diagonal line of symmetry within the quadrant. This creates 4 holes in the quadrant: 2 near the vertical boundary and 2 near the horizontal boundary.
2. Unfolding the horizontal crease: The 4 holes in the top-left quadrant are reflected across the horizontal axis into the bottom-left quadrant. This results in 8 holes in the left semicircle.
3. Unfolding the vertical crease: The 8 holes on the left side are reflected across the vertical axis to the right side, resulting in a total of 16 holes in the fully unfolded circle.
Step 4: Final Configuration
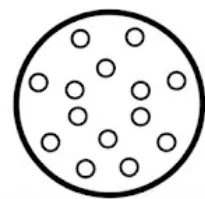
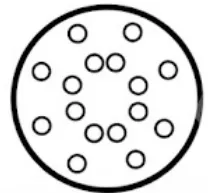
The final unfolded paper will have 16 holes arranged symmetrically in 4 distinct groups of 4 holes each (at the top, bottom, left, and right positions):
- At the top and bottom: Each group consists of 2 inner holes close to each other and 2 outer holes spaced slightly further apart, symmetric about the vertical axis.
- At the left and right: Each group consists of 2 inner holes and 2 outer holes, symmetric about the horizontal axis.
This perfectly matches the pattern shown in the third option image (Option C).
Access expert-curated educational resources and study materials—completely free.
Create, conduct, and manage professional online assessments with Mindyard. Perfect for teachers and institutes.
Copyright © 2026 Mindyard. All Rights Reserved.