
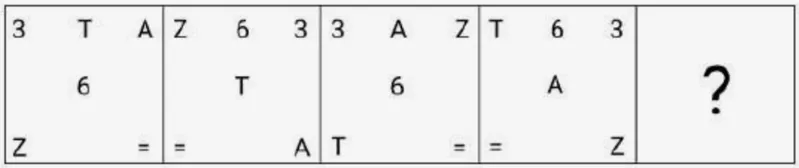
Which figure should replace the question mark (?) if the following figure series were to be continued?
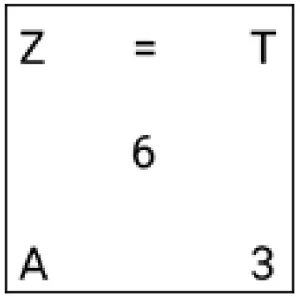
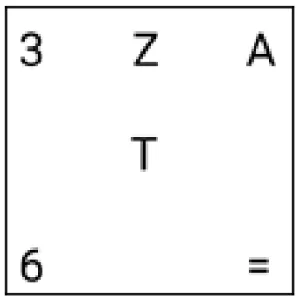
Options
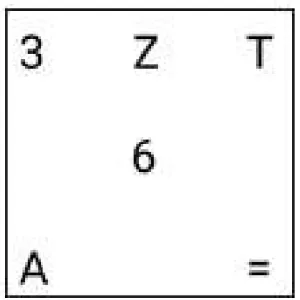
Correct Answer :
Solution :
To determine which figure replaces the question mark (?), let us analyze the movement pattern of each element across the series of boxes step-by-step.
Initial Positions in Figure 1:
• Top-Left: 3
• Top-Middle: T
• Top-Right: A
• Center: 6
• Bottom-Left: Z
• Bottom-Right: =
Step 1: Movement from Figure 1 to Figure 2
• Center Element: The element at the top-middle position ('T') moves into the Center.
• Top-Middle Element: The element in the center ('6') moves to the Top-Middle position.
• Top-Left Element: The element at the bottom-left ('Z') moves up to the Top-Left position.
• Top-Right Element: The element at the top-left ('3') moves to the Top-Right position.
• Bottom-Left Element: The element at the bottom-right ('=') moves left to the Bottom-Left position.
• Bottom-Right Element: The element at the top-right ('A') moves down to the Bottom-Right position.
Step 2: Movement from Figure 2 to Figure 3
• Center Element: The element in the center ('T') moves up to the Bottom-Left position.
• Top-Middle Element: The element at the top-right ('3') moves to the Top-Left position, while 'A' moves to the Top-Middle position.
• Center position: The element '6' moves back to the Center.
Step 3: Movement from Figure 3 to Figure 4
• The element at the top-middle ('A') moves into the Center.
• The element in the center ('6') moves to the Top-Middle position.
• The element at the bottom-left ('T') moves to the Top-Left position.
• The element at the top-left ('3') moves to the Top-Right position.
• The element at the bottom-right ('=') moves left to the Bottom-Left position.
• The element at the top-right ('Z') moves down to the Bottom-Right position.
Step 4: Determining Figure 5 (Replacing ?)
Notice that the transformation pattern from Figure 1 → Figure 2 repeats identically from Figure 3 → Figure 4. Therefore, the transformation pattern from Figure 2 → Figure 3 must repeat for Figure 4 → Figure 5:
1. Top-Left: The element '3' remains at the Top-Left position.
2. Top-Middle: The element 'Z' (currently at top-middle of Box 4) moves to Top-Middle position.
3. Top-Right: The element 'T' (currently at top-right of Box 4) moves to Top-Right position.
4. Center: The element '6' returns to the Center position.
5. Bottom-Left: The element 'A' moves to the Bottom-Left position.
6. Bottom-Right: The element '=' stays/moves to the Bottom-Right position.
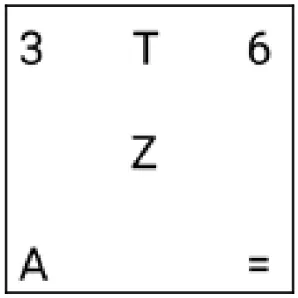
Comparing our derived figure with the given options, the correct box layout contains:
• Top Row: 3, Z, T
• Center: 6
• Bottom Row: A, (empty), =
This matches the correct figure choice shown below:
Access expert-curated educational resources and study materials—completely free.
Create, conduct, and manage professional online assessments with Mindyard. Perfect for teachers and institutes.
Copyright © 2026 Mindyard. All Rights Reserved.